[!] The blog has moved [!]

The blog has moved to http://carlitoscontraptions.com/.

You will be redirected to the new URL in 5 s. Sorry for the inconvenience.

August 29, 2007

DIY Birthday Gift (a.k.a. Nail Puzzle)

Hypothetical situation: Let's suppose tomorrow is your friend's birthday and you forgot to get him/her a present. Also, let's assume you have no money whatsoever, all nearby stores are closed and he/she doesn't like things that come from the garbage.

What to do?
(a) You don't give him any present at all (second best option).
(b) You make a gift yourself (best option).
(c) You go into exile.

I chose "b". Below, instruction on how to make a quick and nice puzzle.

Materials
  • 19 big nails
  • a piece of wood
Tools
  • hammer
  • sand paper
  • sanding machine (particularly useful, but optional)
  • glue
  • drill
  • jig saw
In order to build a nice puzzle that will...well puzzle your friend for a while, especially if he/she is an engineering student, do as follows:
  1. Cut a large piece of wood that will become the main board
  2. Cut a small block that will stand and the nail stand.
  3. Glue them together so they look nice and the nail stand is not in the way
  4. Drill holes of equal depth on the small wood block so 18 nails can stand separately in each hole
  5. Plant a nail in the middle of the board and make sure it is nice and vertical.
  6. If you have some printable labels you can print the game instruction and stick them on an empty spot on the wood board. Make sure you sand everything well before applying the labels.
  7. It should look like the picture below.
Game Instructions: Put all 18 nails on the central nail. The resulting structure should be stable.
This means they should all be placed so that they only touch the central nail's head and maybe each other.

Game Solution: You can find the puzzle solution here.

Now enjoy your new puzzle. _

August 19, 2007

Arduino POV Prototype - Part 2

I polished up the code for my Arduino POV display and I think it is now ready to be shown to the world!

The source code for the POV display can be downloaded here.

The parameters in the code can be changed in order to display other images besides of the default arrows.

Data

The displayed image is stored in the data string. Each drawing is divided in frames (i.e. one frame for each letter of a word) and each frame is divided in columns. The image to be displayed must be encoded into 1s (ON) and 0s (OFF) and each value must be stored in the data string in the order illustrated below.

The duration of each column (i.e. how much time they stay ON), the spacing between frames and the spacing between images are set respectively by the integers timer1, timer2 and timer3. Keep in mind that their values depend on the rotation speed.

Finally, the number of frames and their length is set respectively by frame_num and frame_len.

Arrow (>):
  • timer1: 3
  • timer2: 15
  • timer3: 0
  • data: {1,0,0,0,0,1, 1,1,0,0,1,1, 0,1,1,1,1,0, 0,0,1,1,0,0}
  • frame_len: 4
  • frame_num: 1
"Alan" (my brother's name):
  • timer1: 3
  • timer2: 15
  • timer3: 13
  • data: {1,1,1,1,1,1, 1,0,0,1,0,0, 1,0,0,1,0,0, 1,1,1,1,1,1, 1,1,1,1,1,1, 0,0,0,0,0,1, 0,0,0,0,0,1, 0,0,0,0,0,1, 1,1,1,1,1,1, 1,0,0,1,0,0, 1,0,0,1,0,0, 1,1,1,1,1,1, 1,1,1,1,1,1, 0,1,1,0,0,0, 0,0,0,1,1,0, 1,1,1,1,1,1}
  • frame_len: 4
  • frame_num: 4

Sinewave (or girly flower):
  • timer1: 3
  • timer2: 3
  • timer3: 0
  • data: {0,0,1,0,0,0, 0,1,0,0,0,0, 1,0,0,0,0,0, 1,0,0,0,0,0, 0,1,0,0,0,0, 0,0,1,0,0,0, 0,0,0,1,0,0, 0,0,0,0,1,0, 0,0,0,0,0,1, 0,0,0,0,0,1, 0,0,0,0,1,0, 0,0,0,1,0,0}
  • frame_len: 12
  • frame_num: 1
E = MC^2:
  • timer1: 2
  • timer2: 10
  • timer3: 22
  • data: {1,1,1,1,1,1, 1,0,0,1,0,1, 1,0,0,1,0,1, 1,0,0,1,0,1, 1,0,0,1,0,1, 0,0,0,1,0,1, 0,0,0,1,0,1, 0,0,0,1,0,1, 0,0,0,1,0,1, 0,0,0,1,0,1, 1,1,1,1,1,1, 0,1,0,0,0,0, 0,0,1,0,0,0, 0,1,0,0,0,0, 1,1,1,1,1,1, 0,1,1,1,1,0, 1,0,0,0,0,1, 1,0,0,0,0,1, 1,0,0,0,0,1, 0,1,0,0,1,0, 0,1,0,0,1,0, 1,0,0,1,1,0, 1,0,1,0,1,0, 0,1,0,0,1,0, 0,0,0,0,0,0}
  • frame_len: 5
  • frame_num: 5

August 17, 2007

Arduino Launcher for the KDE menu

The Arduino software is good and works very well under Linux. Nevertheless, it doesn't create a menu item when installed and it can be tricky to create one for those who are not very used to Linux (like me).

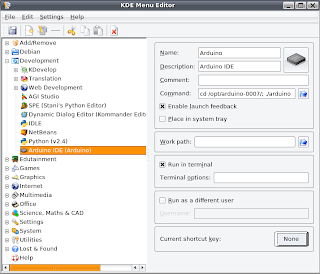
In order to add a KDE menu launcher for the Arduino software, open the KDE Menu Editor, create a new item and put
cd /opt/arduino-0007/; ./arduino
in the Command field. Also, make sure that Run in terminal is checked and replace /opt/arduino-0007/ by your own installation path.

I'm sure there are thousands of other ways of doing this (including many than only require a few commands in the terminal) but at least this ways is pretty simple and and can be done without knowing that much about Linux.

August 13, 2007

Arduino POV Prototype

This is my first attempt to create a persistence of vision (POV) display using the Arduino. The ultimate goal is to mount it on my bike wheel and have it display nice things while I ride. But, for now, it consist of an array of 6 LEDs mounted on a turning rig I made From scrap material.

Materials for the rig:
  • 2 old cell phone batteries (found in the garbage) that serve as a counterweight
  • A piece of metal (from an old photocopier) that constitutes the turning blade
  • A fan motor from some sort of broken power supply I found in the UdeM garbage
  • A piece of plastic that makes the base (also from the photocopier)
  • A plastic poster edge (the things used to hold paper posters) that I found in the garbage (it is used to cover the sharp edges of the blade).
  • A heavy metal block that stabilizes the contraption (since it tends to oscillate a bit when it's turning)
  • A cable with a switch from an IKEA lamp I found in the garbage
  • Lots of cable ties
Materials for the POV circuit:
  • A small breadboard (it came with an electronics magazine)
  • 6 red high power LEDs
  • 6 1 k Ohms resistors
  • A 9V battery w/ battery older
I think the pictures are pretty self explanatory.

The LEDs are directly connected to the pins 2 to 7 of the Arduino and their current is limited by the resistors.
The entire circuit is powered by the 9V battery.

So far I have done some simple patterns for the display and I'll upload the code soon (it still needs some polish)

I expect to add more LEDs to the design as soon as I get the patterns and the overall code working fine.

August 03, 2007

Arduino Clones

For my birthday my girlfriend got me 4 Bare-Bone Boards (from the Modern Devices Company). The boards are fully featured Arduino clones. The only difference with the original Arduino (AFAIK) is that they are cheaper (15$ each or less) and better suited for breadboard connection.

What's an Arduino?
Arduino is an open-source electronics prototyping platform based on flexible, easy-to-use hardware and software. It's intended for artists, designers, hobbyists, and anyone interested in creating interactive objects or environments.

- The Arduino Website -

Note that these clones are cheaper because they require a USB-to-TTL serial cable (20 $). The advantage of this approach is that the cable includes the required USB controller chip and can be used to program many boards. In short, you only need to pay for the USB connectivity once and get to use it on as may boards as you want.

Also, I was very (really very) pleased to see that the Arduino software works perfectly under Linux and that there are instructions for installation on all major distros (including Ubuntu) in the Arduino website.
Update: Here are a few extra shots done with my new camera. This is the new Rev. D board.