
 Inspired by many web sites (1 2 3 4 5), I decided to build my own Van de Graaff generator. It will not raise your hair but it is fun, easy to build, and very cheap. Also it doesn’t require any glue (I always try to avoid glue).
Materials
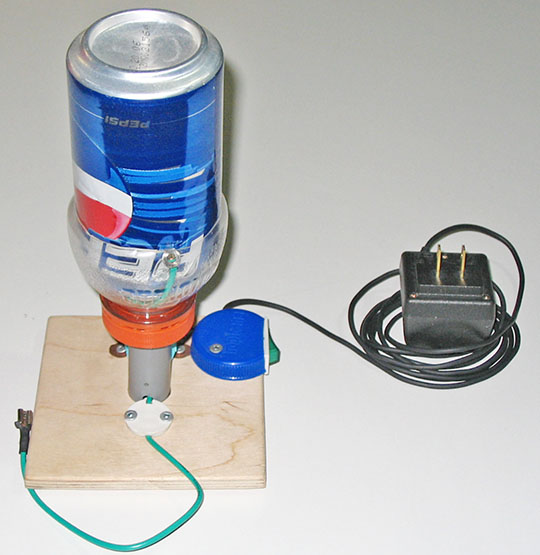
- A soft drink can.
- A Gatorade bottle (or any bottle that, at some point, has a bigger diameter than the can’s diameter).
- A small piece of tubing ( PBC if you’re fancy or just a cardboard roll from aluminium foil).
- A block of wood.
- A small DC motor (from a toy).
- A switch (not mandatory).
- A wide rubber band.
- Another rubber band (a standard one)
- Some pieces of thick cable.
- Some pieces of thin cable.
- Some screws.
- A 3.7V power adaptor that I found in the garbage (or some batteries and a battery holder).
- A small nail.
- A small plastic cylinder from a wire connector.
- A plastic bottle cap.
- A metal or plastic strap.
General Idea
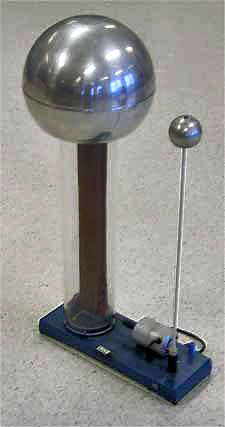
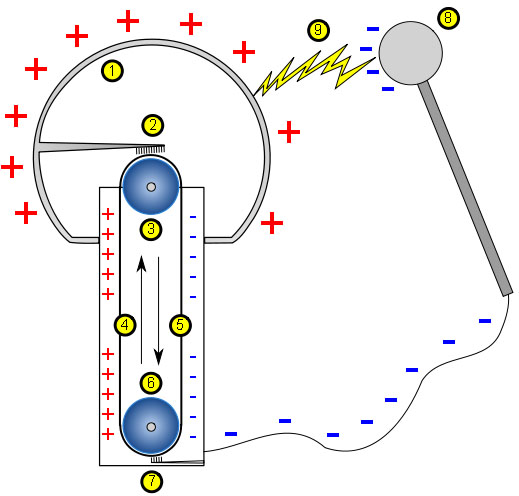
The idea is to have a belt moving inside a tube (4 and 5). The belt rubs two metal combs (2 and 7). One of them is connected to ground (7) and the other one to a metallic sphere(2). The belt takes the charges from ground and carries them to the sphere. The sphere gets charged and voila! you get a high voltage.
 The design
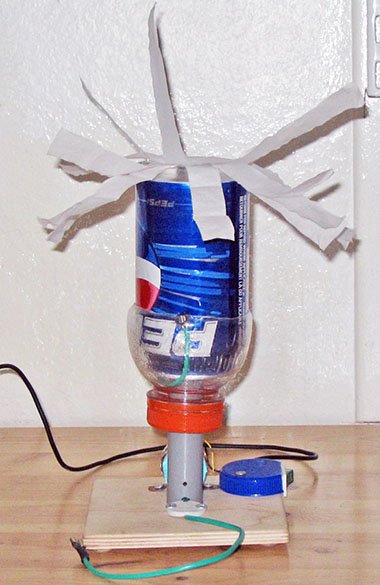
In this design (this is not my design), the wide rubber band is the belt, the soda can is an approximation to the metal sphere, the combs are done with a spread stripped wire, and the a PBC tube is used as… a tube. The belt is hold in place by a nail insulated with a piece of plastic at one end, and by the motor’s shaft at the other end. All these pieces are attached to a wood base for stability.
 Putting it together
 The base:
The wood block will serve as a base. Drill a hole of the same diameter than the tube trough the center of wood block. Then sand it to make it nice and smooth. The tube should fit tight in the hole (see pictures).
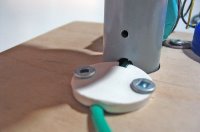
The sphere:
Open the top of the soda can using a knife, tough scissors, a very powerful laser or a small nuclear explosion.
Cut the Gatorade bottle at it’s horizontal indentation so the can fits tight in it (see pictures).
Drill a hole of the same diameter than the tube at the center of the Gatorade bottle cap so it fits tight around the tube (see pictures).
The tube:
Cut a piece of PBC (or cardboard) tube so it is a bit longer (~ 1cm longer) than your rubber band at rest.
Drill a small hole through the tube (slightly bigger than the nail’s diameter) near the top of it.
Drill a larger hole (~5mm diameter) at the place where the motor shaft is inserted into the tube (at around (thickness of the block of wood + motor radius) from the lower end of the tube, ~ 2 cm in my case). The shaft and the nail must be parallel.
Opposite from the motor hole, drill another 5mm hole but lower. The hole should be a (wood thickness) from the bottom.
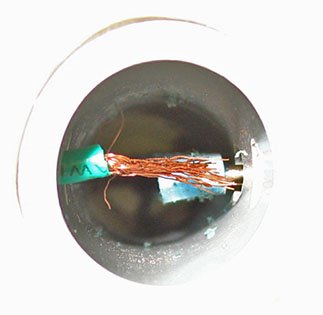
The combs:
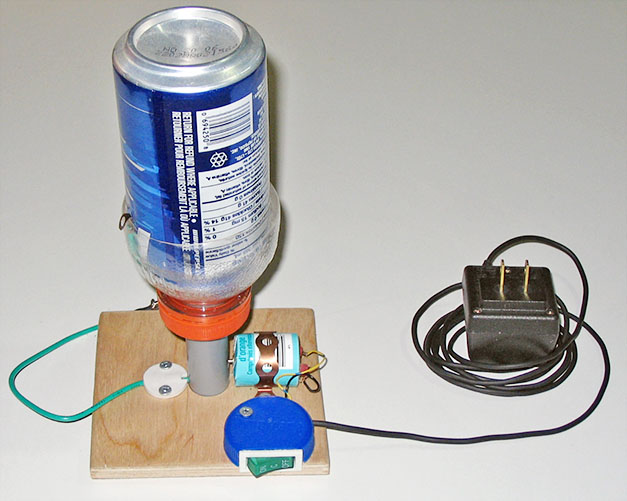
Take two pieces (~15 cm and ~10cm) of thick insulated copper wire (inside, it must not be a solid copper rod but many small wires) and remove the plastic insulation from both ends (or just from one end because your lucky and you have some sort of connector at the other end).
For both wires, spread one of the striped ends in order to form a kind of comb.
The Motor:
If you’re unlucky and your motor’s casing is broken, build a new case around it so the motor is firmly held together. I used a calcium tablets package for this purpose
Assembly
- Insert the tube in the base hole.
- Put the motor’s shaft in its hole and attach the motor to the base with a metal (or plastic) strap and two screws.
- Insert the tube into the caped Gatorade bottle (the cap should face down).
- Insert the nail and its insulation in the tube’s top hole. The wide rubber band should hang from it (inside the tube).
- Attach the comb end of the shortest wire to the top of the tube with a rubber band (I know, I should have found a better way to attach it. Anyways, it turns out to be very robust). The comb should gently caress the rubber band.
- Insert the can and make sure the other end of the wire makes a good contact with it.
- Pull the rubber band from the bottom of the tube so it hangs between the motor shaft and the nail. I think the motor shaft should be insulated but mine is not and it works perfectly well.

- Pass the other comb end wire trough the remaining hole (5mm one at the bottom) so it caresses (lots of caressing going one) the bottom of the rubber band. Fasten the wire to the base with a piece of plastic and some screws, for instance.
- Add a switch, a power source (you can case the switch with a plastic bottle cap).
- Voila! It’s done (you'll have to tinker with it until everything works fine, but that shouldn't be too hard).


2 comments:
Ça c'est vraiment cool!
Wow, un premier visiteur et un premier commentaire. Et positif en plus!
Post a Comment