--------[!]--------
Update: La Cucaracha has got lots of attention lately (mainly thanks to Alan Parekh from HackedGadgets). I found some of its cousins built by 7 year olds. See them at ArtBots Robots.------------------
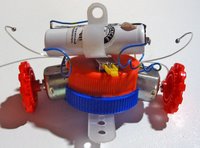
This is a small and very simple robot that requires no electronics. It is inspired on La Coccinelle. They both work according to the same principle, but their bodies and wheels are different. Also mine uses rechargeable batteries so I don’t need to buy new ones after just a few hours of usage.Materials:
- 2 big plastic bottle caps (much like the PC Thermometer)
- 2 Wire ties
- 1 screw
- 2 DC Motors
- 2 toy wheels
- 1 switch (a small one so it fits on the bottle cap)
- Some cables
- 1 Cable holder
- 1 Rechargeable battery pack w/ charger
- 1 3.5 mm audio jack (male and female)
- 2 paper clips (regular size)
- 2 SPDT Switches (commonly found in printers)
Main Idea

The idea is to construct a robot that can move around and that will backup and change the direction of the motion when it hits an obstacle.
Putting it together
- Cut two diametrically opposite holes on the side of the caps so the motors fit in there. Chose one of the caps as your base cap (the one thats goes on bottom).
- Pierce two small holes on the top of the base cap in order to tie the motors to the cap using the small cable ties.
- Cut two more holes spaced by about 1.5 cm so the switches fit in tightly (seeing the pictures help visualizing this).
- Drill a hole in the center of both caps with the same diameter as your screw.
- Install the switch and the female audio jack on the top bottle cap.


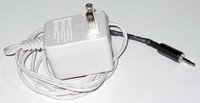
- Connect everything together as shown in the circuit diagram. I used the audio jack to make the charger connection. The charger is simply a 3V power adapter connected in series with a diode in the + terminal.


- Solder the paper clips to the SPDT blades and add a little solder blob on each paper clip end so they look more like antennas.
- Test to see if the circuit works properly. When the robot is switched on, both spindles should spin so it goes forward. If an antenna is pushed, the spindle on the opposite side (left spindle if right antenna) should spin backwards.
- Fasten the motors to the base cap using the cable ties and secure the other cap on top of it using the screw. Also secure the cable holder using the same screw on top of the top cap, this serves as a battery holder.

- Insert the toy wheels on each motor spindle. You can also add a piece of plastic for stability under the base cap.


1 comment:
Muy imaginario y original
Post a Comment